
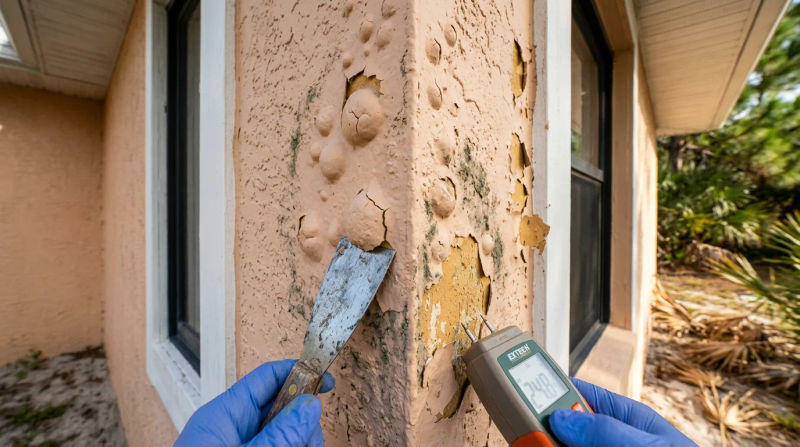
As a Senior Painting Project Supervisor with over a decade of experience in the field, I’ve seen firsthand how the intense Florida climate impacts our homes. You may be noticing it yourself. After a long, hot, and humid summer, you take a walk around your property in the slightly cooler October air and spot them: small, pimple-like bumps or larger, swollen bubbles on your exterior walls. It’s a frustrating sight, especially if your home was painted just a few years ago.
This phenomenon, known as exterior paint blistering, is one of the most common issues we diagnose. It’s more than just a cosmetic flaw; it’s a clear signal that the bond between your paint and the surface underneath has failed. In places like Shady Hills, where morning dew is heavy and summer storms are frequent, these symptoms often become more obvious as the seasons change. Understanding what you’re seeing is the first step toward a lasting solution.
Common Signs and Symptoms
Paint blisters are pockets of fluid or air trapped between a dried paint film and the underlying substrate. They can vary significantly in size and severity, but they generally fall into two categories.
- Small, Pimple-Like Blisters: These are often numerous and clustered together. When you pop one, you might find that the blister only involves the most recent coat of paint. This often points to an application issue, where the topcoat was applied before the primer or previous coat was fully dry, or it was applied in direct, intense sunlight.
- Large, Widespread Bubbles: These are more concerning. These bubbles can sometimes be as large as a quarter or even a silver dollar. If you scrape one away, you’ll likely see that the paint has peeled all the way down to the bare stucco, wood, or siding. You may even feel dampness on the exposed surface. This is a classic sign of moisture under exterior paint trying to escape from within the wall itself.
On the stucco-finished, concrete-block homes that are common in Shady Hills, especially those built in the 1980s, these blisters can be particularly noticeable. The texture of the stucco can hide minor imperfections, but a blister creates a smooth, raised dome that stands out. When these paint bubbles on siding or stucco appear, it's your home’s way of telling you there's a problem that needs attention before it leads to more significant paint failure and substrate damage.
What Causes This Problem
Blisters don't just appear without reason. They are symptoms of an underlying cause, and successfully fixing the problem requires an accurate diagnosis. In our experience, the culprits are almost always related to moisture, heat, or improper surface preparation.
1. Moisture Intrusion This is, by far, the most frequent cause of Shady Hills exterior paint problems. Our hot, humid Central Florida environment is constantly trying to push moisture into and out of our homes. When water or water vapor gets trapped behind a coat of paint, the sun heats the wall, causing that moisture to expand and push the paint away from the surface, forming a blister.
Sources of moisture include:
- High Humidity: The air itself carries a lot of water vapor, which can be absorbed by porous substrates like wood or older stucco if not properly sealed.
- Rain and Sprinklers: Water driven into cracks, gaps around windows and doors, or directly from a misaimed sprinkler head can penetrate the substrate.
- Internal Moisture: In some cases, moisture from inside the home (like a bathroom without proper ventilation) can travel through the wall assembly and get trapped behind the exterior paint film.
- Painting on a Damp Surface: If a surface isn't allowed to dry completely after pressure washing or a recent rain, the new paint will trap that moisture, guaranteeing future blisters.
2. Excessive Heat During Application Painting in direct, blistering sunlight is a common mistake. When a dark-colored paint is applied to a hot surface, the top layer of the paint film flash-dries almost instantly. This traps the solvents from the paint underneath, which then vaporize and create small bubbles as they try to escape. An organized workflow, which our technicians are trained to follow, involves working around the house to stay out of the direct sun, ensuring the paint has adequate time to cure properly.
3. Poor Surface Preparation Paint is only as good as the surface it’s applied to. A durable, long-lasting paint job relies on a meticulous preparation process. If the surface is not properly cleaned, adhesion will fail.
- Contaminants: Dirt, mildew, chalking from old paint, or oils can create a barrier that prevents the new paint from forming a strong bond.
- Skipping Primer: Primer is essential for creating a uniform, sealed surface that new paint can adhere to. This is especially critical on porous materials like the stucco finishes on many 1980s-era homes in the area or when painting over a glossy surface.
- Painting Over Old, Unstable Paint: If the existing paint is already failing, painting over it is like building a house on a crumbling foundation. All loose or peeling paint must be scraped, sanded, and feathered before any new coats are applied.
When to Call a Professional
It can be tempting to treat exterior paint blistering as a simple DIY fix. You see a bubble, you scrape it, and you touch it up with a little paint. While this might work for a single, tiny blister caused by a minor application error, it rarely addresses the root cause of widespread issues.
Here’s when it’s time to call for professional help:
- The Blisters Are Widespread: If you have bubbles appearing on multiple walls or in large patches, it points to a systemic issue, most likely moisture. Simply scraping and painting will not solve it; the blisters will return.
- You Suspect a Moisture Problem: If you scrape a blister and find the surface underneath is damp or the paint peels down to the bare substrate, you have a moisture problem. A qualified professional has the experience and tools, like moisture meters, to trace the source of the water intrusion. This is not something to guess at.
- The Blisters Return After a DIY Repair: This is a sure sign that the underlying cause was not addressed. Continuing to patch the area can build up thick layers of paint, making a future professional repair more complex and costly.
- Your Home Was Built Before 1978: While most homes in the Shady Hills area are newer, if you have an older property, there is a chance of lead-based paint being present. Safely handling and removing lead paint requires certification and specialized equipment.
Experienced painting professionals follow a standardized process. Our crews begin every project with a thorough inspection to diagnose the root cause of failures like blistering. We don’t just paint over problems; we solve them by ensuring the surface is clean, dry, and properly sealed before a single drop of new paint is applied. This methodical approach is the only way to ensure a beautiful finish that lasts.
Conclusion
Seeing your home’s exterior paint bubbling and blistering can be disheartening, but it’s a problem that can be permanently solved with the right approach. Remember that these blisters are symptoms, not the problem itself. The true culprit is usually moisture under exterior paint, excessive heat, or inadequate preparation.
As we move into the drier, cooler days of October, now is an excellent time to assess your home's exterior and address these issues before they worsen. Ignoring them can lead to wood rot, stucco deterioration, and more extensive paint failure, resulting in a much more expensive project down the road. Acting early is the best way to protect your investment and restore your home’s curb appeal.
If you notice any of these signs, contact a local Painting professional for an inspection. They can help you accurately diagnose the problem and recommend a durable, long-term solution.